 Opening up a wood kiln is like unwrapping Christmas presents-you may have an idea what to expect, on the other hand, you can get some real surprises! What I find the most strange, is how difficult it can be to figure out if the surprises are good or bad. It can take months, even a year or more to really “digest” the serendipitous effects off flame, wood ash and the myriad variables of the firing.
I had two sculptural, medieval inspired vases in the kiln, both had a salt-white glaze, and came out weirdly brown speckled. My first response was yuck, not what I had hoped for-and not what I had got from the same clay and glaze combination in Previous wood firings in the same kiln! In fact, there was another vase in this firing, same clay, same glaze, but it was a re-fire from the previous firing. In that previous firing, there were parts of the kiln that just didn’t get hot enough to properly melt the glaze. But this time, that pot came out with a kind of lovely glow-I’m so glad I re-fired it. But what of the two speckle monsters? Hmmm. Not so sure about those, have to sleep on that for a few months.  Then there were the mug re-fires. These were all made from “C Body” East 40 clay, and had been through a 6 day anagama firing this past October. They too must have been in cold spots in that firing, the glazes were rough and underfed. This is a clay I formulated less than a year ago, so I’m keenly interested in putting it to the test in every way possible. I had pieces in the Peter’s Valley anagama firing, in locations of the kiln that got up to cone 11 (the clay was formulated for cone 10) and there was no trouble at all. No flaws of any kind in the clay. There were also no flaws after the October 6 day anagama firing-but this re-fire kind of “fried” them, since they were located in parts of the kiln that overshot the firing range of this clay body. Let me explain.
We used cone packs that had two cones below our target, (cones 8 & 9) our target cone (10) and a “guard” cone of 11. In the photos, the order from left to right is 8,9,10,11. In the first photo, you can see a perfect 10.The number 10 cone (third from left) is making a perfect arc, the tip down to the level of the base. There is daylight under the arc, as there should be. By contrast, the lower temp cones 8 & 9 are no longer an arc, they are a puddle, and cone 11 is only beginning to bend. In the second cone pack, there is no daylight anywhere under these cones, even cone 11 is a melted puddle on top of the clay that held the cones in place. What this means is that in that section of the kiln, we blew past our goal of cone 10, and because 11 is a puddle we must have actually hit cone 12. I found out the hard way the upper limit of the C body clay; it was fine at cone 11, but cone 12 was just too much. One of them cracked early enough in the firing that the glaze hadn’t melted yet, since, the glaze healed over the crack completely. Another had little bloat bubbles. The work had been over-fired enough to become so brittle that several of them had chips that broke off the bottom where there was no glaze to support the clay. To be fair, they were really close to the firebox, which hit at least two cones above our target, as explained above. And in spite of the flaws in some of them, others have no visible flaws and they certainly didn’t melt into a puddle or even slump, which can happen when a low-fire clay is high-fired.
I fired an odd little piece I had done as a demo for texturing slabs, and making a draped form with visible slab joins from them. On the inside I sprayed on the East 40 ash glaze (that I formulated) in a fairly thin layer, and the outside was a combination of two different shinos and a salt white glaze and a little bit of the East 40 ash. For a little throwaway pot-I was going to just recycle the clay after the demo, but decided to keep it to just to experiment with glazes-I’m surprised at how good it looks.
In short, the work I cared most about-the medieval inspired vases-came out just whatever, while the piece that took me 10 minutes to make came out great. Or at least that’s what I think today. Maybe I’ll wake up in 6 months and have a totally different opinion. Please comment and let me know what you think!
0 Comments
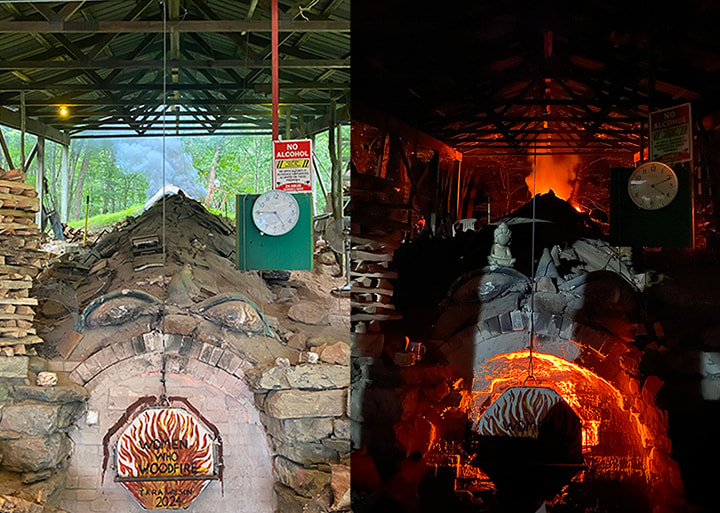 The Anagama kiln at Peter's Valley School of Craft-left, in the day, the same at night. Even without the added eyeballs and horns, the anagama kiln at Peter’s Valley would look like a dragon. It only gets fired once per year, it takes a lot of wood and a lot of people power to fire this 57 foot long kiln-and that’s exactly what I was up to for this past week. As I write this, the kiln is cooling down, I will post again after the unload which is coming up this Sunday.  A view of the interior of the kiln during loading; the very back section is already loaded here, but this gives you an idea of the interior, which is embedded into the hillside. I worked nights, and hung out during the day as much as I could when I wasn’t sleeping. The workshop was led by the Tara Wilson, an amazing artist with a trove of woodfire experience. Charlie Lid was on overnights (among a lot of other things), a veritable brain trust who has fired this kiln 22 times and made repairs to it. The staff at Peter’s Valley is awesome, all in all it was a great group of people. From loading to finishing was all interesting, but my favorite part was the overnight crew firing the kiln. Each night got hotter, and the last night was just nothing short of magical. We were giving the kiln exactly what it wanted (with Charlie’s interpretations) and it responded. In a few hours, we side-stoked over 900 pieces of wood, and that not counting what was put in the main firebox at the mouth of the kiln. There was music on, and all of us at some point were literally dancing; there was so much joy, we were dancing with the kiln. It’s an experience I will never forget.  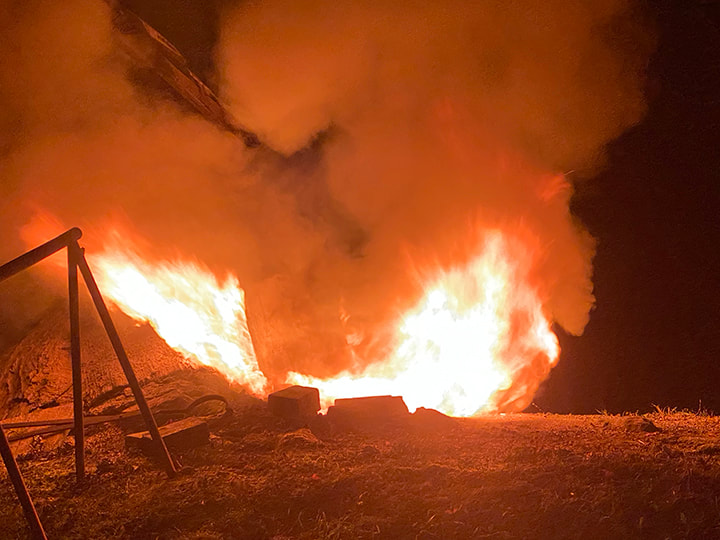 View of the back of the kiln. The damper is resting on bricks only inches from the ground, but even at the sides where the damper is right on the sides of the kiln, the flames hungry for oxygen are finding their way out. It’s hard to come up with words that describe the sheer power and elemental force of the flames within the kiln, that on that last night refused to be contained by the lids on the stoke holes, or the damper at the end of the kiln. Note that in the above photo and video, there is nothing “open” on the kiln; there are lids on the stoke holes and a big solid damper covering most of the end of the kiln-but the fire was so powerful that after we would stoke, it would erupt like a volcano from the slightest of gaps.
 Vase made from the new clay body featuring East 40 clay. You can see the clay with no glaze at the bottom, and where I did strokes of wax resist as seen on the view to the left. A glaze featuring the East 40 clay was used at the top of the pot, you can see it's darker than the glaze below the neck of the pot.. As promised, some results from the test kiln firing. After making the part 1 post, I realized that it was just too technical for a blog post. I reached a kind of crossroads where I realized I needed to create a section of the website for technical information. If you want something more in depth than this post, go to my new Ceramics-Technical page, and the pages that branch off of it. The little test kiln did reach cone 10 (approx. 2,381 F) but not without a battle of many hours in the sweltering heat. Luckily, it was worth it. The firing gave us really critical information; how will the new clay body behave at high-fire temperature in reduction (oxygen starved) kiln atmosphere, which is how we fire the wood kiln? And, how will the 25 glaze recipe variations with the East 40 clay look and behave on the new clay body? Overall, the results were a smashing success. Both clay body, glazes, and the way the glazes look on the clay body passed with flying colors. Again, I'm not going to go into all the technical results here, but I do want to show you some of the highlights of what came out of the little kiln. 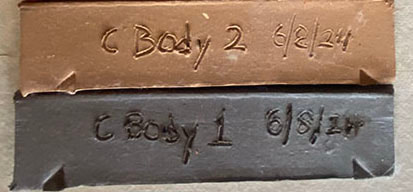 These test bars were literally cut out of the same slab of clay. The on on the bottom was in the test kiln firing (in an oxygen starved "reduction" atmosphere) and the one above fired in an electric kiln in an oxygen-rich atmosphere. In the test bars above, you can see the color of the clay with no glaze for yourself. In addition to the tile in the test kiln firing, the dark one at the bottom of the photo, Gabbry Gentile was kind enough to fire the one on top in the electric kiln up at the ceramics studio in Penn Hall on the main campus. I formulated this clay body for high temperature firings like we do in the wood kiln at the East 40; the real shocker, was that this clay body works at the medium range temperature used in the studio on campus! I won't go into the technical details here, but suffice it to say I was honestly shocked at how well this clay performed in an electric kiln at mid-range temperature!  This was one of 25 glaze variations tested; the only ingredients used in this glaze are the clay from the East 40, wood ash from the wood kiln at the East 40, and eggshells that I saved after using eggs from a local farm. Ash glazes are supposed to show dramatic drips; the trick is, you don't want them to run off the pot. This test tile was photographed on its back because of sun glare, but it was standing up on vertical when fired in the kiln. The pleasant surprise was that all the variations of the ash glaze stayed up on the tile, none of them ran off the tile at the bottom which is a big problem with a lot of ash glazes. Many ash glazes can only be used at the top of the pot, they are so runny. This was the runniest variation, and even it didn't run off the tile. Long story short, we already have usable glazes based on the East 40 clay and wood ash, and they work great on the new clay body!  2 parts East 40 clay to one part ash from the East 40 wood kiln, on the new East 40 clay body Above is the simplest glaze recipe I tested-and my favorite result! The drips are less dramatic without the eggshell. It's such stable glaze that I can see using it on an entire pot, not just at the top for a drippy effect. The color comes primarily from whatever is in the East 40 clay, educated guess, a lot of iron.
Getting back to the vase at the top of this post, the dark part at the top is the same as the tile above, except there is an addition of copper oxide. The pot was first dipped in a glaze we had on hand from previous wood kiln firings, we wanted to see how it worked on the new clay body. The red you see, especially on the view to the right is actually from the copper-rich glaze I was testing at the top! All in all, we got lots of very helpful information from the test kiln firing. In all honesty, I didn't expect this much success in a first time at full-temperature firing! |
Cindy VojnovicArtist & Educator Archives
September 2025
Categories
All
|


 RSS Feed