 No one on my volunteer list showed up, but luckily Alejandro Zuniga and Connor McGaughran came to my aid for the August 18 clay dig. More accurately, it was clay prospecting. The idea was to get samples that my advanced students will be testing this fall. More than 5 years ago Walter Heath and his students processed quite a lot of clay that was dug on high ground, on the Eastern edge of the East 40. We have been working with that wonderful stash of clay ever since. But that clay isn’t going to last forever, and before we do any large or even medium scale processing of clay, I want to know what we’re going to get. For comparison, I went to one of the lowest lying areas.  The new site; Alex had put a tarp on a week before the dig to kill weaken the tangle of weeds that were in this new dig location. We took three 5 gallon buckets of clay, the first 18 inches down, the next about 30 inches down and the last bucket at 44 inches in depth. The color became more purely orange/gold the deeper we went. In addition to testing the clay locations, I want to compare dry vs. wet processing. So I’m not only going to test the new location with the existing clay which was wet processed, but the new location with clay from the old location that will be dry processed. Luckily for me, there is a significant amount of quite pure clay that has been sitting in a pile in be old location!  We pulled the tarp to the side, and pot the topsoil on the tarp, topmost layer to the right and deeper layers going to the left on the tarp. That way, after digging, we could replace the soil in its correct layering. There are advantages and disadvantages to either dry or wet processing of clay. I fear that the wet processing that was originally done may be superior, but before I go there I want to test for myself. Is a significant difference, which is easier, and which is gives the better quality of clay? Both wet and dry processing use screens of decreasing size first to screen out larger things likerocks and roots etc., then to get increasingly fine particles of clay with screens that have smaller and smaller openings for the material to pass through. In the wet processing, gravity is used as well; the heavier materials fall to the bottom of the barrel while the lighter ingredients are pumped of the top into the next bucket and the process repeated until you get the level of fineness that you want. The original wild clay from the East 40 we have been using, until mixed with other ingredients into a clay body, is very brittle. It lacks plasticity, that is the soft pliability that we want in clay. It cracks very easily, and it’s hard to cut it without tearing the clay. On the plus side, it has low shrinkage and beautiful color. It’s obviously iron-rich, but I don’t know the precise chemical composition. Maybe I can find someone in the chemistry department willing to test it. I think it’s unusually high in alumina, because on pots made with the clay even glazes known to be very runny stop being runny. It is actually a spectacular glaze ingredient, a kind of mysterious “special sauce.” I was really happy we were able to get samples from a new location at 3 depths to test. Even just processing and testing small amounts is a lot of work. Keep checking in to this blog to see how that evolves! 
0 Comments
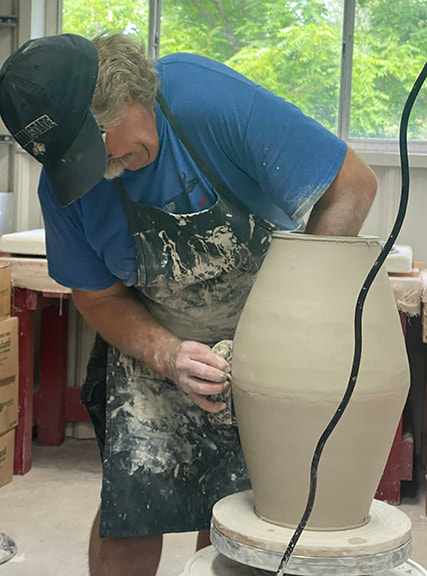
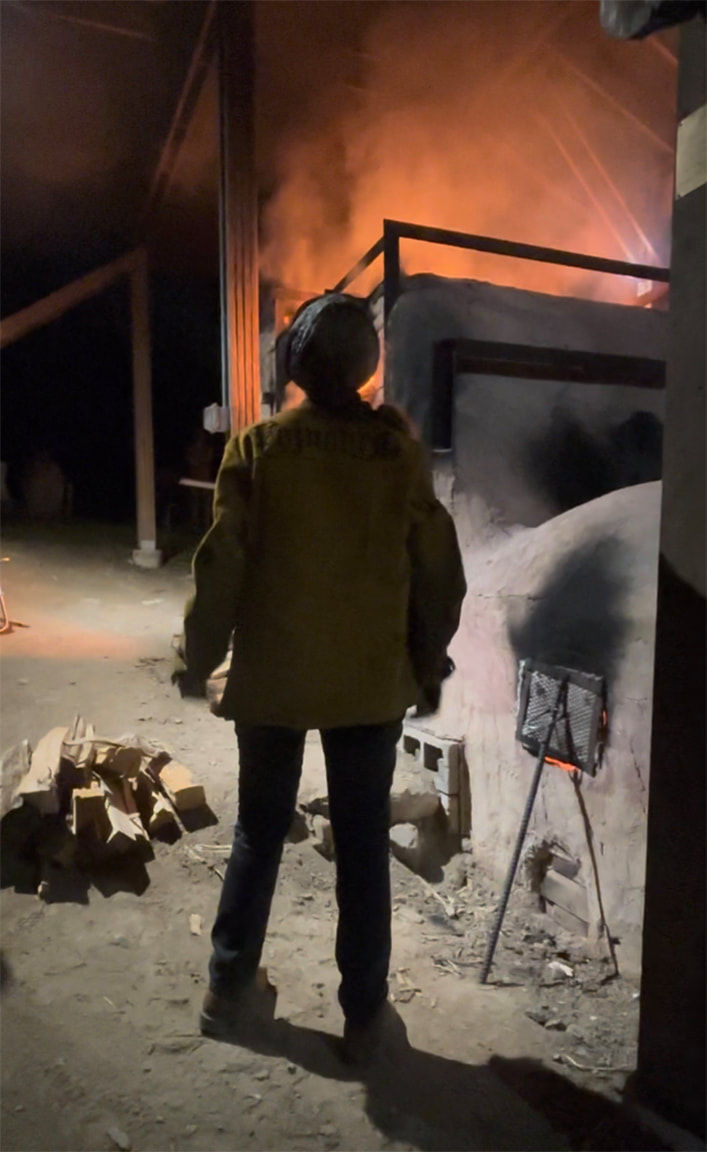 Me watching the noborigama Kiln at Peter's Valley When Peter’s Valley announced this year’s workshop schedule, I was at first perturbed that they had shifted the firing of their anagama (see dancing with the dragon) from August, before fall semester begins, to mid-October. Then I noticed they had scheduled Josh DeWeese to do a workshop firing the noborigama. Josh DeWeese was a long-time director of the famous Archie Bray Foundation, and is a stellar artist I wanted to work with, so I took the plunge and signed up. 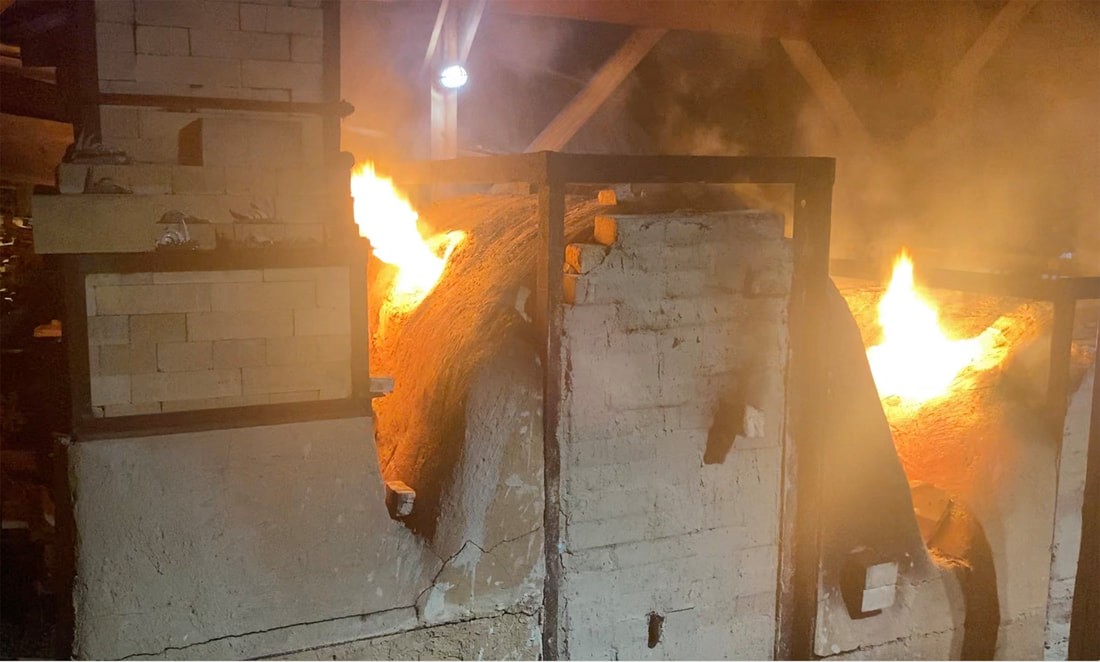 Noborigama kiln, view from the chimney end at the top, looking down on the blowholes of both chambers. When the fire in the blowholes dies down, it's time to stoke with more wood. A noborigama is a multi-chambered wood-fired kiln, and the workshop was shorter than theanagama one so I went in to the workshop expecting a kind of “anagama light” workshop that was essentially loading the kiln and firing it for the whole time. I certainly didn’t expect the actual firing of the kiln to be only 24 hours (after pre-heat) or all the demonstrations. I was expecting that, like the anagama, the outside of the work would be dominated by wood ash deposits turned to glass (glaze) by the heat, and that I would only be applying glaze on the inside of the pots, with little or nothing on the outside. The workshop began with Josh showing us his more elaborate process of glazing, suited to a shorter wood-fire and soda kiln. In the noborigama at Peter’s valley, the first chamber is wood only, and the second chamber is a soda-fire chamber. The soda jacks up the color response and flow of glazes. Applying glaze for that atmosphere (soda) was totally new for me, and to be honest, I didn’t really take advantage of much of the flood of information Josh gave us, especially not on my Medieval inspired vases. There were some in the workshop who did a very good imitation of Josh’s style, and got great pots as a result. But as much as I love Josh’s work-I was thrilled to buy a fabulous pitcher that he used in his glaze demo-but I just couldn’t instantly figure out how what he demonstrated could be used on my Medieval inspired work. Luckily I brought a bunch of mugs that were plain enough in form that I didn’t mind getting more elaborate with the glazing. 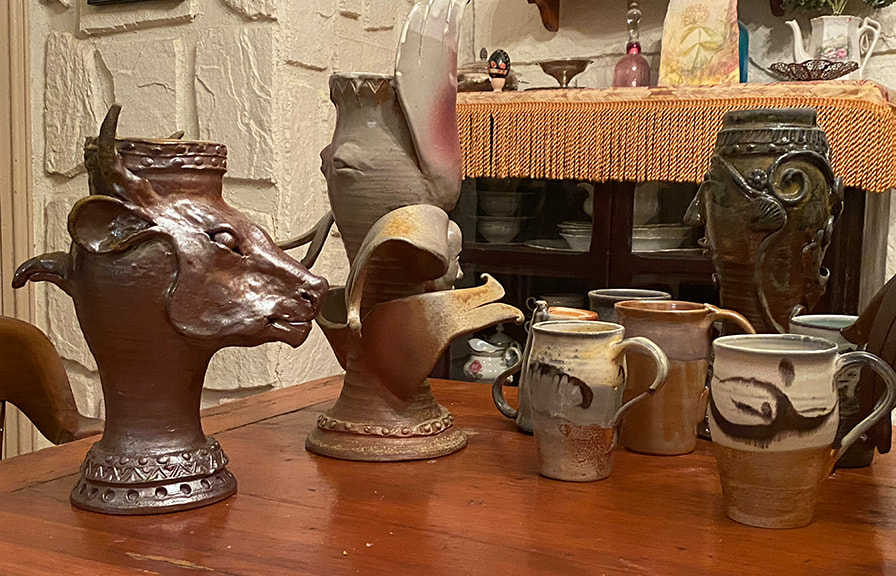 Some of what came out of the kiln, including mugs where I experimented more with the glazes. I have to admit I did a pretty fast down-and-dirty glaze job on my pots, in part because as explained above, I knew I didn’t have the time to fully process how this glazing approach could work for the forms I brought to fire. The other reason was, I wanted to be right there for all the kiln-loading. Loading a wood kiln is a crucial part of the process, and one I’m keen to learn about since I actually get to do that at the NCC East 40 wood kiln. It was so exciting to see my work go into the kiln; it seems that catenary arch kilns just love my work. “I need something tall and skinny” is almost a cliché when loading a catenary arch kiln; my work loves snuggling up to the curved walls of the kiln. When they put in my Hypnos at the top of the arch, I had to snap a photo before all the rest of the work got packed in. 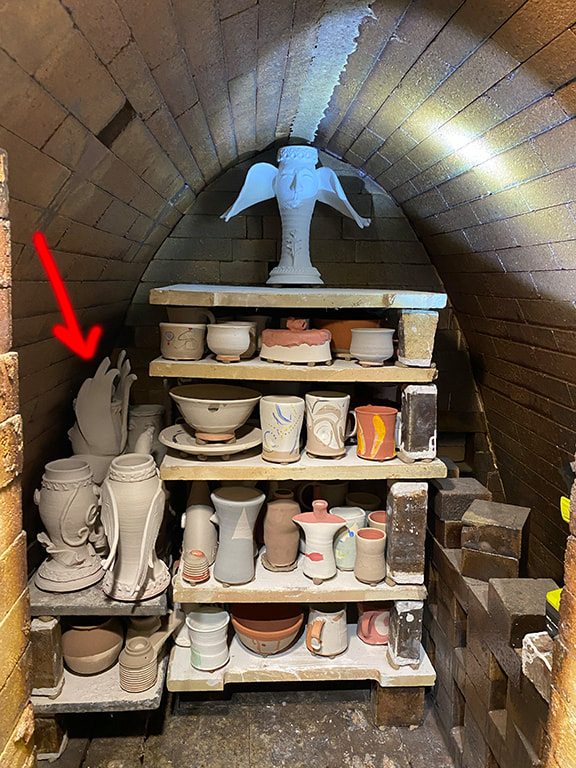 Red arrow pointing to an entire shelf of my work, snuggling into the side of the arch. Hypnos at the top doesn't need an arrow at this point, though later there was of course plenty of worked packed around him. I of course signed up for a double shift in the overnight, and figured if the firing didn’t end on my shift I would just stay until it finished anyway. I can’t lie, it felt a little weird doing a short firing with so many people. Last December I did a 24 hour firing at the NCC wood kiln, but there were way fewer people, and I did the last 17 hours of that firing non-stop. Before my shifts, I did a lot of hanging out at the kiln watching others do all the work, which was very strange for me. Firing the anagama for a full week, everthing happened slower. I felt like by the time I adjusted to the rhythm of this firing, it was over. 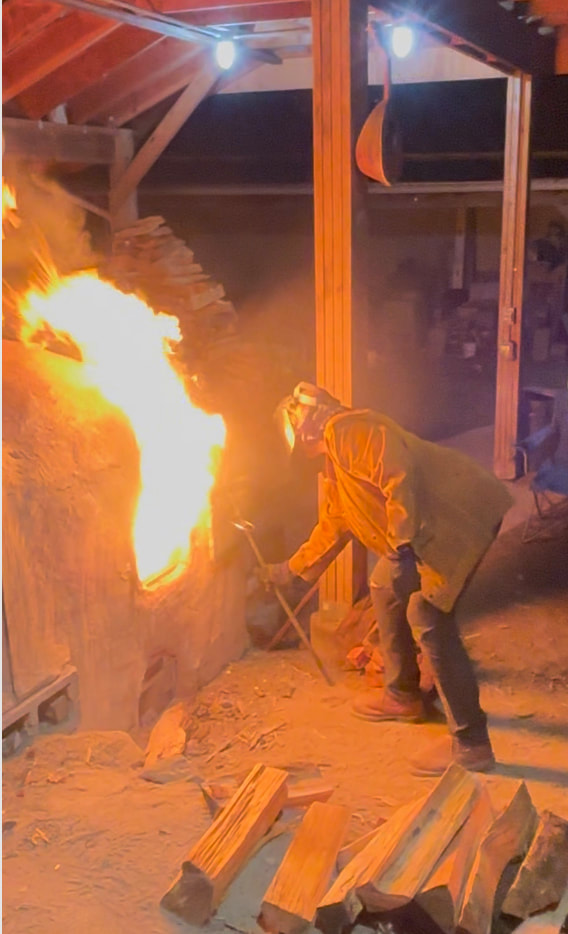 A shorter firing means a shorter cool-down period. After the anagama, we left and came back the next week. But since this was only a 24 hour firing, we stayed while the kiln cooled. That was when Josh DeWeese switched into high gear, spending a whole day and the following morning in a marathon making demo. It made me tired just to watch him, 😂 ! His sense of humor was delightful, I don’t know how he managed to tell fun and illuminating stories while he made incredible work and simultaneously explained what he was doing and gave insightful tips. I frequently botch demos because I’m so busy trying to explain what I’m doing that I can’t do it. (Once I joked I can’t chew gum and walk at the same time, and one of my students, apparently never having heard that expression, took me seriously, and said “really?!”) I absorbed so much from Josh DeWeese!!! Not just technique, or art-but how to make a supportive positive space in which people can best learn. His teaching is nothing short of spectacular, he gets it right from every possible angle. Generosity is the term that springs to mind. He really gave of himself, and he’s got a lot to give.
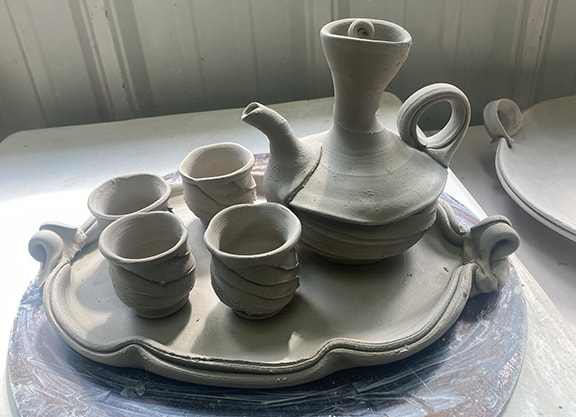 Among the many pieces he made was this "liquor set" including cups, ewer and platter. You can see a giant platter that he made in the upper right hand corner.
When we gathered to unload the kiln, he coached us; “the appropriate response when something comes out of the kiln is Ooh! Ah!!” He had us all reapeat the oohing and aching until we reached an appropriate level of positive enthusiasm. He said not to be dissapointed if something didn’t turn out as expected; to live with it before making judgments. That bit of advice I had heard before, but it is so true with woodfiring in particular. You often get something out of the kiln that is not at all what you were going for-and it can take a while to figure out if that’s a good or a bad thing. 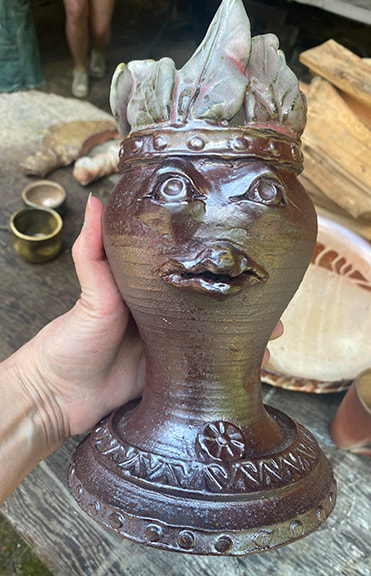 One of my smaller vases, hot out of the kiln. The East 40 clay can totally take over a glaze. I had to apply the glaze at the top on his crown of leaves/feathers incredibly thick for it to show up at all. I felt like the pace of the workshop was perfect. I got enough rest that I could absorb all the new experiences and information like a sponge, but at the same time, there was never a dull moment. I’m still absorbing and working with what I learned, and will be for some time to come.
Finally, the thing that astounded me most about the Josh DeWeese workshop was that it did exactly what a vacation is supposed to do. I felt like I got out of the usual grind, experienced wonder, and gave me time to reflect on just how blessed I really am. It’s now a few weeks since the workshop and I’ve been working a lot, but that feeling is still with me. 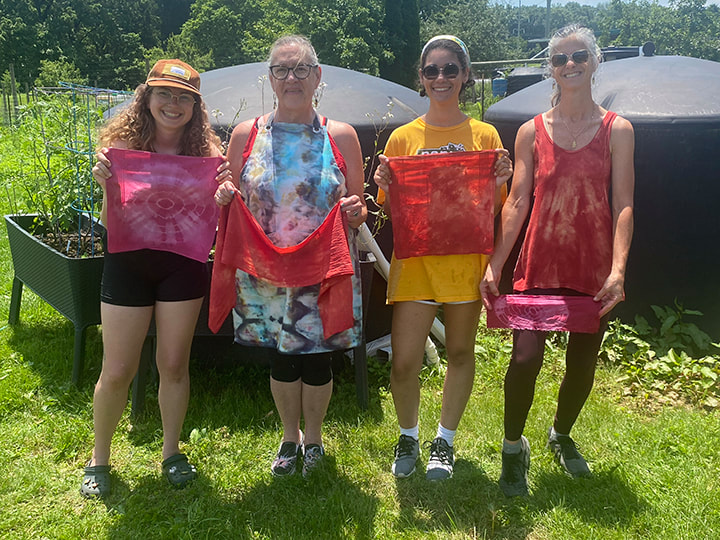 When I began working with natural dyes, I wanted the intense earthy madder root reds I saw in the dye books. But alas, my attempts on cotton were an endless source of frustration and (to me) unsatisfying PINKS, not REDS. Preparing fiber for natural dyes is a protracted and somewhat arduous process. No matter if the fiber is brand new or not, it has to be “scoured” at about 165 degrees with a neutral soap and soda ash for an hour. After that, it has to be thoroughly rinsed. Then the fiber has to be mordanted, aluminum acetate for vegetable fiber such as cotton, alum and cream of tartar for animal fiber such as wool. The fiber sits in a hot bath of the appropriate mordant solution overnight, then once again has to be thoroughly rinsed. But no, that’s not all. The fiber has to be completely dried at this point and after that dipped in a solution of calcium carbonate and rinsed yet again. Adding another step to this fiber prep routine wasn’t at the top of my list of things I wanted to do. But I was so determined to get a good red, that I got ground oak gall and inserted yet another step in the process, pre-mordanting. This involves another hour of simmering (in the oak gall solution) and then, you guessed it, yet another round of rinsing. This pre-mordanting is inserted in-between the scouring and the mordanting. I scoured, pre-mordanted, mordanted and calcium carbonate dunked cotton fabric before dyeing with madder root. It worked. Eureka-bing bing bing!!! At long last, I was able to achieve the deep red that I had always dreamed of on cotton. (Wool is much more agreeable to taking up dye, and I first achieved a good red on wool.) 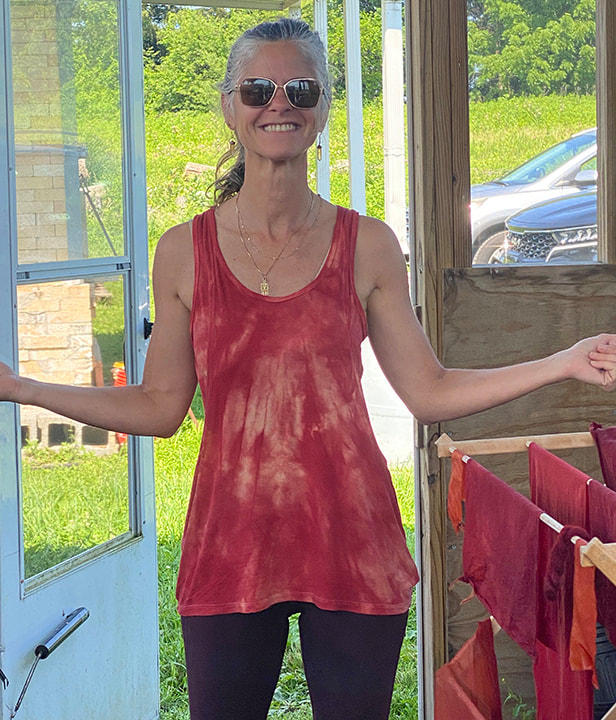 Jen Kimock with a her madder-dyed shirt This year, when I did the Intro to Natural Dyes and fiber prep class, I pre-mordanted with the oak galls. That set the stage for the Reds dye class a few weeks later. To be honest, I had only done tests with the oak gall pre-mordant thing, I had never pre-mordanted with oak galls at a bigger scale. I knew it would work, because I had tested it. But what I didn’t realize, was how much less of the madder root I could get away with using fabrics that got the royal pre-treatment, so to speak, with the oak gall pre-mordanting. The books say for madder that to get an intense red you use as much madder, by weight, as the fabric-a 1:1 ratio, or even madder up to twice the weight of the fabric. The big surprise from this year’s class is just how much the pre-mordant jacked up the power of the dye. We got a really strong red so fast! In the past to get that good a red, I would have to keep the fabric in the dye pot for a week, heating it up again every day. I could have probably used half the weight of madder in proportion to fiber, the pre-mordanting jacked up the color response so much. So the bad news was I used way more (expensive) madder root than I probably needed to. The good news was, the results were great. 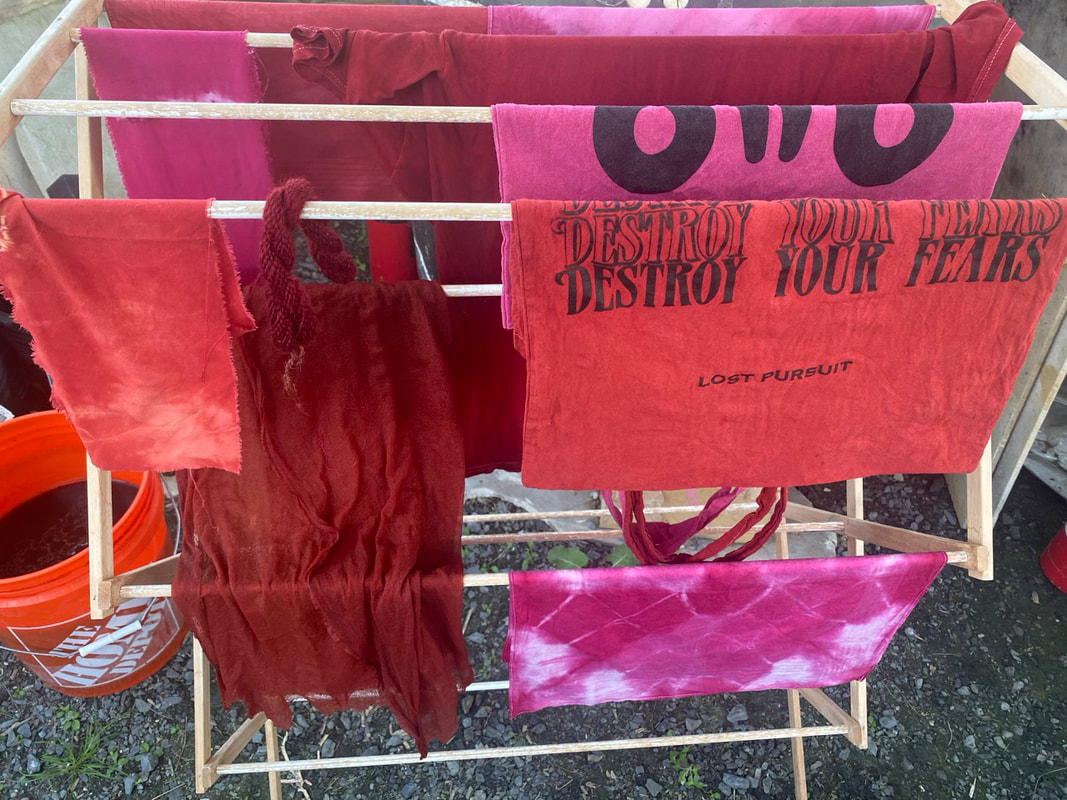 Drying rack with an array of reds from madder root and cochineal beetle natural dyes Cochineal (a South American beetle that grows on prickly pear cactus) was the dye we used on the second day of the workshop. Madder root tends towards the warm side, while cochineal tends towards the cool, magenta/purple side of red. The second day of the workshop, we used cochineal. Many natural dyes take a lot of time and “coaxing”, but cochineal is relatively dramatic and fast. Cochineal can be overdyed on top of madder to get the kind of red you envision from a box of crayons. By its self, cochineal can seem more magenta pink or purple-ish red; or so I thought. In the “goody bag” of prepared fabrics that each student in the workshop received, was a piece of bamboo rayon. (The goody bag also included a cotton bandana, bamboo rayon scarf, wool and a strip of silk charmeuse.) One of these pieces of bamboo rayon by mistake didn’t get taken out of the dye pot until the day after the workshop. The fabric had been tie dyed, and in the sections that were free to absorb dye overnight, the color was far deeper than I am used to seeing with cochineal. I’m not sure if that is due to the length of time in the dye pot, the pre-mordanting with oak gall, or some combination of the two. 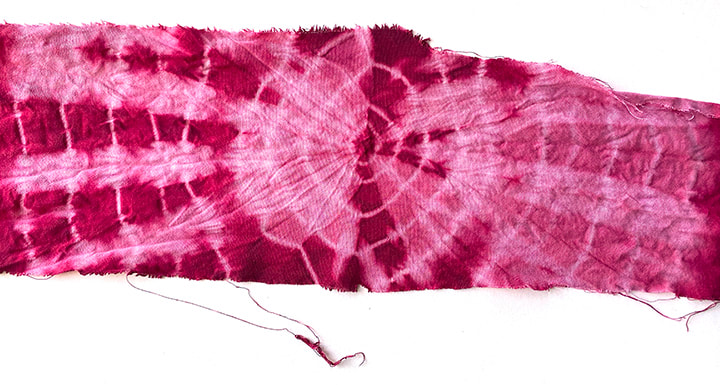 One thing about natural dyes, is there is no end to what you can learn. There are just so many variables that affect the outcome, that the possibilities are endless. This year’s reds class was particularly satisfying! After all the struggles (and failures) I had attempting to get strong reds, this year’s class was a breath of fresh air. It was the only class this year that wasn’t filled to capacity, but the students were so wonderful that it was totally fine.
 When I began working in ceramics all those years ago (the 1970’s!) I can recall being disappointed, first in high school and then in college, at the “lack” of color in the available glazes. We all had our boxes of crayons bursting with color, and even the cheapest mass-produced consumer goods were glaring with color. Even today, consumer goods (even foods) are bursting with artificial color. We inhabit mostly a built environment (how often are you out in nature?) where a cacophony of accidental color prevails. For example, I’m thinking of a very tastefully designed lounge, with all the furnishings and carpets and such color coordinated-inhabited by people sporting all kinds of colors, carrying bags and things with even more crashing colors that were most decidedly not a part of the designer’s scheme. I think we learn to ignore all these clashing colors as some kind of self-defense mechanism.  I have to admit, it could be age. But it could also be looking at lots of great pottery-Bernard Leach, Shoji Hamada, Michael Cardew, Phil Rogers, Matthew Blakey and plenty of works by unknown potters in museums-I’m coming to appreciate the palette of winter. It’s like a palette cleanser for the eyes. For me, the browns aren’t neutral. Some are russet, some cool, some tawny, and these browns are punctuated (some days) with blue sky, and evergreens wearing their dark green winter coats. And when it snows, the blue sky is replaced by white, silver and a range of greys as varied as the browns they cover, to varying extents depending on how much it snowed. Don’t get me wrong, I still love the deep saturated colors of medieval stained glass, for example, but I’m also appreciating the subtle symphony of colors that winter offers.
Even as a child I loved drawing bare trees, fascinated by the spooky dark trunks and branches, the more gnarled the better. But the NCC East 40 is mostly meadow. The mountains, ocean and even forest that I always tended to associate with “nature” just are not there. Much like the winter palette of colors, which I’m enjoying more and more, I’ve come to appreciate the subtlety of the forms of the meadow. Today a new revised reprint of Bernard Leach’s classic tome “A Potter’s Book” arrived. This edition has color versions of most of the pottery examples, and they are very much in keeping with the winter landscape. Right now I’m perfectly content to inhabit the colors of winter. 
I knew I wanted to use gold on my ceramics before I even knew why! Real gold will evaporate, “volatilize” is the technical term, if exposed to the high temperatures needed to fire the clays that I use. I confirmed this the hard way, three years ago I embedded some tiny bits of gold foil around the rim of a pot, and even in the preliminary “bisque” firing (not as hot as the final glaze firing) the pot emerged from the kiln without a trace of the gold. You’ve probably seen fine china that has gold trim or accents, for example around the edges. The way it’s done, is that you glaze and fire the whole thing first, without the gold, at the usual high temperature. Then, you apply the gold and fire at a much lower temperature to “fix” the gold permanently onto the ceramic. This is what’s called an “overglaze,” and what I finally got around to doing!
With wood firing, you can’t control exactly how anything is going to come out, and honestly the serendipity of it is a huge part of the attraction. But sometimes a piece comes out of the wood firing and, well, needs some help. Well, I had some pieces that just needed a little oomph, a little spark, an accent.Two of them had a lovely, ivory colored satiny glaze surface; but they were to subtle, they needed an accent, some pop. On the other end of the spectrum, I had a piece with a kind of mottled surface, mostly quite dark. Finally, I had a piece that had quite nice “flashing”-effects of the fire on the clay, which highlighted the sculptural form really well-but the surface was quite dull and matte, no shine.
 Opening up a wood kiln is like unwrapping Christmas presents-you may have an idea what to expect, on the other hand, you can get some real surprises! What I find the most strange, is how difficult it can be to figure out if the surprises are good or bad. It can take months, even a year or more to really “digest” the serendipitous effects off flame, wood ash and the myriad variables of the firing.
I had two sculptural, medieval inspired vases in the kiln, both had a salt-white glaze, and came out weirdly brown speckled. My first response was yuck, not what I had hoped for-and not what I had got from the same clay and glaze combination in Previous wood firings in the same kiln! In fact, there was another vase in this firing, same clay, same glaze, but it was a re-fire from the previous firing. In that previous firing, there were parts of the kiln that just didn’t get hot enough to properly melt the glaze. But this time, that pot came out with a kind of lovely glow-I’m so glad I re-fired it. But what of the two speckle monsters? Hmmm. Not so sure about those, have to sleep on that for a few months.  Then there were the mug re-fires. These were all made from “C Body” East 40 clay, and had been through a 6 day anagama firing this past October. They too must have been in cold spots in that firing, the glazes were rough and underfed. This is a clay I formulated less than a year ago, so I’m keenly interested in putting it to the test in every way possible. I had pieces in the Peter’s Valley anagama firing, in locations of the kiln that got up to cone 11 (the clay was formulated for cone 10) and there was no trouble at all. No flaws of any kind in the clay. There were also no flaws after the October 6 day anagama firing-but this re-fire kind of “fried” them, since they were located in parts of the kiln that overshot the firing range of this clay body. Let me explain.
We used cone packs that had two cones below our target, (cones 8 & 9) our target cone (10) and a “guard” cone of 11. In the photos, the order from left to right is 8,9,10,11. In the first photo, you can see a perfect 10.The number 10 cone (third from left) is making a perfect arc, the tip down to the level of the base. There is daylight under the arc, as there should be. By contrast, the lower temp cones 8 & 9 are no longer an arc, they are a puddle, and cone 11 is only beginning to bend. In the second cone pack, there is no daylight anywhere under these cones, even cone 11 is a melted puddle on top of the clay that held the cones in place. What this means is that in that section of the kiln, we blew past our goal of cone 10, and because 11 is a puddle we must have actually hit cone 12. I found out the hard way the upper limit of the C body clay; it was fine at cone 11, but cone 12 was just too much. One of them cracked early enough in the firing that the glaze hadn’t melted yet, since, the glaze healed over the crack completely. Another had little bloat bubbles. The work had been over-fired enough to become so brittle that several of them had chips that broke off the bottom where there was no glaze to support the clay. To be fair, they were really close to the firebox, which hit at least two cones above our target, as explained above. And in spite of the flaws in some of them, others have no visible flaws and they certainly didn’t melt into a puddle or even slump, which can happen when a low-fire clay is high-fired.
I fired an odd little piece I had done as a demo for texturing slabs, and making a draped form with visible slab joins from them. On the inside I sprayed on the East 40 ash glaze (that I formulated) in a fairly thin layer, and the outside was a combination of two different shinos and a salt white glaze and a little bit of the East 40 ash. For a little throwaway pot-I was going to just recycle the clay after the demo, but decided to keep it to just to experiment with glazes-I’m surprised at how good it looks.
In short, the work I cared most about-the medieval inspired vases-came out just whatever, while the piece that took me 10 minutes to make came out great. Or at least that’s what I think today. Maybe I’ll wake up in 6 months and have a totally different opinion. Please comment and let me know what you think! Please note: these videos take a while to load. (Having technical problems and don't have enough hours to throw at solving them right now) The burn ban was finally lifted, and on December 18 we finally began the firing. The two anagama firings I did in August and October went on for 5-6 days; but this firing was scheduled to be completed in just over 24 hours. To get the work “fully cooked” meant that we had to actually reach higher temperatures in the kiln than would be the case if we were firing over many days. The cones behind the removable bricks were our only way we could be sure when the work in the kiln was fully “cooked.” The heatwork needed to achieve cone 10, our goal, is considered to be 2,381 degrees. That level of heatwork can be reached by more time at over 2,100 degrees, but for a one day firing we were going to need all 2,381 degrees to get cone 10 to bend over. Gabby Gentile and Connor McGaughran (my student worker at ESU) had been there since 2 in the afternoon, and stayed with me well past their points of exhaustion until after Dave Graham (Kiln Building Guru) was able to join me. With two fireboxes needing to be stoked every few minutes, this was a skeleton crew. It was after midnight that Gabby and Connor finally went home, and it was just Dave and I for the rest of the night, until the end of the firing the next morning. I took the left firebox, and Dave the right. It’s crazy how kilns have a personality, and how two fireboxes that should be identical, one right next to the other, can behave so differently. The left side of the kiln runs colder, the coals don’t burn down to ash fast enough, so the left firebox can get so choked with coals that it restricts the needed airflow on that side. How much, what size and what kind of wood to put in, and when, are decisions that are constantly being made. You don’t just chuck wood into the kiln and hope it works; this too is an art. Pine combusts faster, but doesn’t have the staying power of hard wood, it’s kind of like a sugar high, you either feed soft wood constantly or it can crash. Hard wood can actually make the temperature drop while it’s trying to combust. Likewise, the thinner the wood is cut, the faster it catches fire-and burns out. Getting the right mix of types and sizes of wood, how much room you leave open in the firebox, how often you stoke-all this has to be right, or the kiln will let you know. There’s a wonderful “roar” when a kiln is really hot, and it’s happily digesting just the right amount of wood.  Sunrise at the East 40-one of the perks of doing all-nighter's at the kiln is getting to see the sunrise The night was beautiful. It would have been cold being out all night like that, but the kiln generated so much heat that being so close, I didn’t need most of the layers of clothing I had brought. The wind was going in the right direction, I think it actually helped us. Pyrometers that measure the air temperature in the kiln are not terribly accurate at the higher temperatures, but they do let us know if the kiln is getting hotter or cooler, which is critical information for figuring out when to stoke for example. As the kiln heats up, everything wants to expand. I’m glad Dave was there when one of the steel tie rods holding the kiln together popped under the pressure! Wow, that made me jump. He had just replaced the tie rod above the one that broke, and assured me it would be fine. You could see the other tie rods bow with the pressure the kiln was exerting as it expanded, but they held. Even if we hadn’t had the pyrometers, as in olden times, you can really tell when a kiln gets up to those higher temperatures well in excess of two thousand degrees! At 9 something in the morning, Cone 10 had made it’s perfect arc on the top right, and both cone 10 and 11 weirdly were bending together on the bottom left; we got to our goal. Once we reached our cone 10 goal, we stuffed the fireboxes as full as we could get them, then shut off all access of air to the kiln. Kilns go crazy when you do this! Any tiny sliver of space, around a brick, around a door, the flame tries to reach out, gasping for oxygen. That’s when you walk around the kiln-any gaps anywhere become really obvious with flame shooting out of them! The “door” of the kiln is temporary, rebuilt for every firing, so flames shooting out from there are not a problem. But if places that should be tight open up, this is when you find them. The fire just burns itself out, smothers-then you have to wait, and wait, for it to cool down. The bigger the kiln, the better insulated it is, the longer it takes. This post is already way too long, so you have to look at my next post for the unloading!
 Cone packs that will measure the "heatwork" achieved insidethe kiln at various locations A delightful part of my part-time job as Manager of Ceramics at the Northampton Community College (NCC) East 40 is firing the wood kiln there! I had fired that kiln a number of times before, but for this Fall’s firing, I took on more of the work than in previous firings. I made the cone packs, for example, and made more of them than we had ever used in a single firing. Cones are scientifically formulated to bend over at very specific levels of “heatwork.” Heatwork is a matter of both time and temperature. The example I always give is lasagna. The oven may be 400 degrees, but if you only leave the lasagna in for five minutes, it’s not going to be cooked through! On the other hand, even if the oven is only 350 degrees, if you leave it in for 40 minutes it’s probably going to be fully cooked. Cones measure to what degree the ceramic is “cooked,” much like how a meat thermometer measures the temperature of the meat itself, not just the air in the oven.  The kiln fully loaded. Note the two fireboxes below the "ware" chamber where all the work is stacked, and the cones placed on various shelves in the kiln. There was a cone pack for almost every shelf, so we can tell afterwards how hot each region of the kiln was It was the first time I actually got to load a wood kiln, which takes a surprising amount of skill, not to mention hoisting really heavy silicon carbide shelves into place. All the hours I had spent watching others load wood kilns was invaluable. The idea is to understand how the flame moves through the kiln, and much like playing pool where one ball bounces off another, you want to bounce the flame onto all the pots, ideally send the flame everywhere, reaching every pot without restricting the path through the kiln. No pot can touch, or even get too close to touching, yet you have to do a kind of Jenga where you get as much work into the kiln as possible. The way ash moves through and lands on the work is another consideration. Suffice it to say it was an honor, and I was holding my breath that certain decisions I had made would work out! For example, Kelly Allen noted that no one had ever put the center shelves as far to the front as I had. Yikes! I was hoping for better flow through the kiln, more ash, but what if it just meant that the work closer to the front door didn’t get hot enough? Gulp.
The door for the kiln gets built for every firing! First, the bricks. I actually really enjoyed custom fitting the last brick at the top of the arch, you can see it’s a lighter color than the bricks next to it. In previous firings we had done two bricks that stick out beyond the others, so you could remove them and see the cone packs strategically placed in the kiln for that purpose. For this firing, in addition to the two “peep” bricks, a third one with a hole in the middle was set up as a “blow hole.” Long story short, when flame is no longer coming out of the blowhole, you know it’s time to stoke. After the bricks were in place, Gabby Gentile (professor at NCC) and I “mudded” the door, which is pretty much like it sounds, although we used wet reclaim clay, not the kind of mud you have in a garden. Nothing like hands wet with “mud” in the winter. Then, for extra help so not so much heat escapes from the “door,” a special high-temperature cloth that looks like cotton but is not flammable, supported with a wire mesh was placed over the door. The pots were all loaded, the kiln was ready; but we had to leave it like that for weeks waiting for the burn ban to be lifted.
 Getting the yellow out; the yellow liquid that is not permanent goes through the cloth which is being used like a filter, but the blue woad pigment, which is a solid, gets captured in the cloth. I harvested more than on June 19, but I used about the same amount of water when I processed it. This led to a super-concentrated batch, which of course led to new discoveries. More on that later in the post.  Dipping the scarf in the woad after adding alkali but before introducing oxygen, which turns it from a dye to a (solid) pigment. I decided after adding the wood ash (to bring the PH up to 10) but before pouring it back and forth between the buckets (to oxygenate) to dye a bamboo rayon scarf. As is usual with both woad and indigo, when the vat is reduced (low oxygen) it’s a deep green, and so is the fabric when you first pull it out. But then when exposed to air (oxygen) it turns a true blue. In the case of fresh woad leaves like I was using, there is a significant amount of fugitive yellow in the leaves; and when I dyed the scarf, I had done nothing to get rid of that yellow. In any case-the scarf ended up a really lovely blue; so lovely it’s tempting to just keep it as is. But of course I’m curious about what if…I’ll get to that later. But now onto getting rid of the fugitive yellow.  At left, the color of the infusion after removing the leaves. At right, the same liquid after adding the alkali and exposing it to oxygen (by pouring it back and forth from one bucket to another.) After dyeing the scarf, I did the pouring back and forth to oxygenate the infusion of woad leaves (I had already taken the leaves out, it’s like making tea.) Woad and indigo are actually pigments, that is, a solid; dye penetrates fiber, indigo and woad coat the fiber. When I used a higher water-to-woad ratio to make the “tea,” (see my last post) the heavier, solid pigment sank to the bottom, and the yellow liquid could be scooped or siphoned off the top. But this batch was SO PIGMENT HEAVY that the pigment didn’t settle at all-even after sitting overnight! I just went ahead and tried to strain it; normally, again, the yellow goes through the cloth and the blue pigment gets trapped on top of the filter cloth. But the “waste” water after I strained the liquid (first photo at the top of this post) was not yellow-it was really dark. Obviously there was a lot of pigment left, so I strained the “waste” water a second time. Sure enough, this second straining captured plenty more pigment on top of the cloth. Doing a more concentrated batch seems to be a great way to avoid lifting larger, heavier buckets! However, it means that the pigment won’t settle, and has to be strained at least twice.  I’m kicking myself for not also dyeing a fabric swatch in addition to the scarf. That way I could cut the swatch in pieces, and try different stuff with the pieces to make comparisons. I wonder if next time I process woad, I gave the scarf an additional dip, if that would make the color deeper? I have this strange suspicion it wouldn’t do much! My reasoning is that there was SO MUCH pigment in that water, it was so concentrated, that the reason it didn’t go darker is chemical, not WOF (weight of fiber) to woad pigment ratio. So the second thing I want to do, is take some of the purified pigment, and reduce it again to make a dye vat, and then re-dye the scarf. My prediction is that without all the fugitive yellow still mixed in, the color of the fabric will go way deeper. Now I have to do another batch of woad, and put my theories to the test.
One last observation, woad is definitely a cut-and-come-again plant. The woad out at the NCC East 40 is happy that I’ve been persistently pulling the weeds to give it more room. Today-one day after I harvested the woad I’m showing in this post-you can’t even tell that I just harvested yesterday!  Woad in the bucket, after adding water soaked in wood ash, and before straining and drying into a powder It’s a constant battle to pull out the weeds in my woad bed, to give the woad some room to grow. Woad-which has the most active ingredient (indigotin) we need for both dye and pigment-is harvested from first-year plants which grow very close to the ground. The local weeds jump up quickly, leaving the woad literally in their shadow. This past week I pulled wheelbarrows full of weeds out of the woad bed, and the woad responded almost in front of my eyes, I swear the woad was visibly more abundant by the end of the week. Tired as I was yesterday, I wanted to capitalize on this temporary moment of victory-so I harvested some woad. 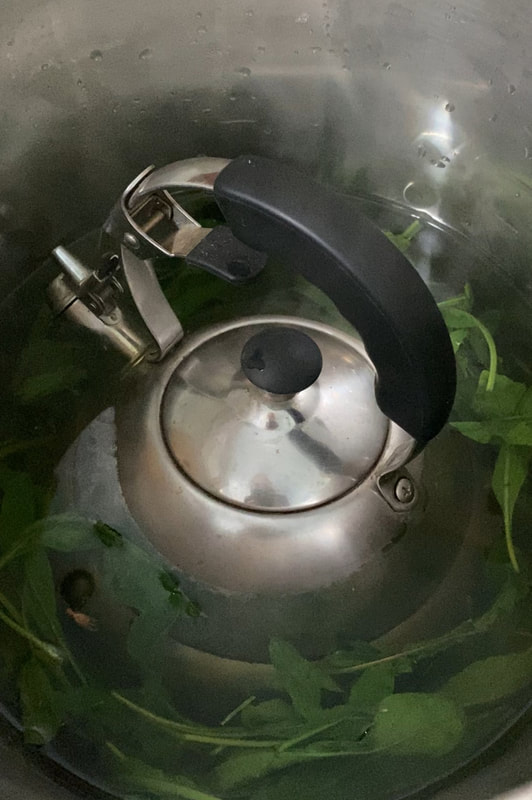 The weird thing was just how easy it seemed. I would compare it to making dinner; it took effort, yes, but it wasn’t like it sucked up the whole day, just one smallish part of a normal day. (If you want to see the whole process, reference this blog post.not-what-youre-supposed-to-harvest-in-october.html) I used less than 500 grams (about a pound) of fresh woad leaves. The first step is like making tea; you don’t boil the leaves, you pour the water onto the leaves and let them steep. You’re supposed to weight the leaves down, so they are surrounded by water during the steeping; I’ve used bricks inside of tupperware and all kinds of crazy things to try to do this, but last night’s innovation was I just stuck my tea kettle (with water in it for weight) on top and it was so easy! The kettle of course has a handle, so it was easy to lift the kettle and stir occasionally. O.K., not exactly earth-shattering but when you do something enough times, all these little discoveries and refinements help to streamline the process, and make it easier.  Left, sample from old batch, right, sample from yesterday's batch! The one on left started out green; even though it's losing the fugitive yellow from sun exposure, it's still much lighter, not as concentrated/has more impurities than yesterday's batch at right. I got a good yield of super-dark, rich pigment. (See right above) Once I dry the pigment into powder, I like to put each batch into its own little jar. I can compare the color of batch to batch that way, and this batch was definitely top-notch. For comparison, once I did a huge batch, and just didn’t have the patience to wash/strain out all the (non permanent) yellow from the liquid, long story short. I just dried the slurry as-was, and it was a lighter, kind of greenish blue, not the “true blue” that I just got in this smaller batch. So, I put the powder in a nice transparent glass jar and have kept it in the sunniest window in my house. The blue woad pigment is permanent, the yellow not permanent. In the 2 years that the pigment from that batch has been in my window, it has become increasingly blue! I would be wary of using that batch for a painting that I want to last indefinitely, but it was a fun experiment. Even after two years though, it’s not as good as the much more pure batch I made yesterday. Moral of the story I think, is make more small, easy to do batches.
|
Cindy VojnovicArtist & Educator Archives
September 2025
Categories
All
|


 RSS Feed